Contents
8 Steps Anime Boy’s Head & Face Drawing Tutorial
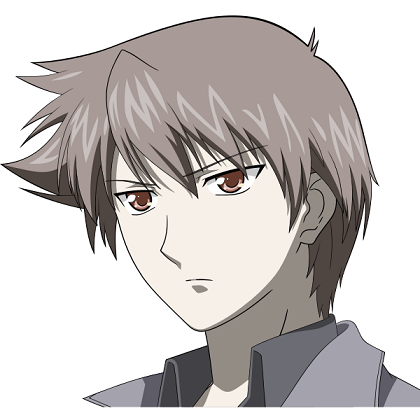
Anime Boy’s Head & Face Drawing Tutorial – This step-by-step tutorial explains how to draw an anime boy’s head and face. Demonstrates how to draw facial features with regular anime scales and place them on the head. There are also essential tips for shading and colors.
Anime Boy Drawing 8 Steps
The example of a boy used in this study could be between 10-15 years old. But when it comes to older anime characters, they can sometimes draw and look very small. So this type of character can also be used to draw a high school student.
Please keep in mind that there is no clear way to draw anime characters. Dimensions and placement of facial features vary greatly depending on the style and preferences of the artists.
The purpose of this tutorial is to provide general guidelines for drawing anime or manga facial features that can be very helpful if you are trying to learn to draw in style.
If you follow the tutorial using pencil and paper, make sure you draw straight lines for the first steps to quickly erase the different parts of the drawing if needed.
When you digitally draw, your options will depend on your software.
Step 1 – Building a Boy’s Head
As we draw the boys’ heads, we want to draw a round face as long faces make the character look older.
To paint the head in the front view, first, draw a straight line to help you make sure both sides are aligned. Draw the top of the lead closer to the half-circle, and from there, draw two lines down to the other. Draw another set of strings on those lines that will meet to form a chin.
To draw a side view of the head, pull the top of the head next to the oval shape and then remove the area of the nose/jaw on top of it.
When drawing a side view of a boy’s head, avoid drawing the lips of the first drawing. You can also estimate where the nose should go. By carefully positioning the nose, you can see the fourth step of the lesson.
Step 2 – Drawing A Boy’s Ears
To place the ears, draw a horizontal line in the middle of the head. Between this line and the chin, draw another horizontal line. The ears will be about as long as the distance between the two lines.
Please note that natural ears are very far from the head, but we will use different scales to draw an anime boy and not a real one.
Step 3 – Drawing A Boy’s Eyes
To paint the eyes, you can also use a horizontal line between the head. Draw eyes directly below this line.
Also, note that natural eyes are drawn directly in this line or above them. Anime characters usually have their eyes painted very low on their face.
The eyes should be comprehensive (long) as we draw a little boy. The large and wide eyes give the character a minimal look.
Draw eyebrows slightly above the eyes. You can also draw a small number of eyelashes between the eyebrows and eyes.
Step 4 – Drawing A Boy’s Nose
To set the nose, draw another horizontal line between the face and chin. Draw a nose above this line.
However, note that the actual nose is on the face’s surface. However, anime noses can be significantly reduced if you draw characters with huge eyes and long.
Step 5 – Drawing A Boy’s Mouth
To paint the mouth, draw another horizontal line between the nose and chin lines. But instead of removing the mouth directly on this line, you will want to pull it slightly above. The reason is that this line will give you a lower lip placement which in anime is usually not drawing at all.
Step 6 – Drawing Boy’s Hair
Although there are many ways to color anime hair, they are usually pulled with large clumps. For this, we will draw a style of dirty hair.
Step 7 – Cleaning the Drawing
When all the facial features are set and you have finished painting the hair, clean all the guidelines and wipe the scalp hidden parts of the hair. You may also want to override your drawing with heavy strokes or black lines.
When you are done, you should have a nice and clean drawing of the head and face of the anime boy.
Step 8 – Anime Style Color & Shading
The tracking system used for anime and cartoons is often called “Cel Shading.” In short, it is a tracing method where there is no gradient but a solid line between standard and shady areas.
For this study, we will use the most common shading. This means we will shade in areas where most normal light conditions are usually dark. In this case, it will be the neck and lower extremities of the hair that bend inwards towards the face.
You can also add eye shadows to create hair, eyelashes, and a shaded area on one side of the nose (usually, this will be the opposite of the light source).
The highlight areas will be eye reflections and highlighting in the hair. You may want to leave these whites altogether or shade them a little.
To color and shade, a drawing first fills in each area with its color and then applies the shadows at the top. When drawing on paper, leave out highlights / white markings if digital drawing is added after completing everything else.
Conclusion
There are many ways and styles to draw an anime character, but as mentioned, this tutorial gives you some guidelines to help achieve the typical anime look of a young male character.