Contents
How To Draw A Head And Face Of Anime Girl
Draw A Head And Face Of Anime Girl – This tutorial explains how to draw a girl’s head and face in anime or manga from the front and back.
Before you start drawing, it is a good idea to describe the defining features of the anime style.
Many female anime characters tend to have big eyes, smallmouth, nose and chin, and a round face. The lips are usually slightly defined or not painted at all. The hair is usually cut into pieces instead of individual strands and usually has a nail-shaped appearance.
If you are drawing with pencil and paper, make sure you draw straight lines for the first parts of the lesson as you will need to erase some details later.
Step 1 – Drawing a Head
You can draw a straight line down the middle of the head to look forward to helping ensure that both sides are aligned.
Make a circle or a bright oval to look forward and a long oval to look sideways to help get the top shape of the head.
You can produce two sets of floor lines from the oval/circle around the chin joint for a preview.
On the side view, there will be a kind of retreat in the nose/eye area. Draw the nose in the middle between the chin (covered more in Step 3) and in the middle of the head. You can draw a straight line from the top of the nose down to the chin (verbal details will be added in Step 5). And with a side view, you can draw a line up from the chin and bend over and look at what will later be the shape of the ears to form the lower jaw.
In both cases, draw the chin slightly and almost straight but with a slight curve at the bottom.
You can see the primary curves and head shapes of anime or manga styles in the example above.
Step 2 – Drawing Ears
To set the ears, draw a horizontal line directly between the head and draw another line between that and the chin. Draw ears between the two lines.
By setting aside, the view of the ears will be placed more slowly behind the head than before.
Step 3 – Eye Design
Anime eyebrows can vary depending on the style and type of character, so there is no sure way to place the lower part. To put the eyes on the head, you can use the same straight line to identify the upper part of the ears. Draw eyes directly below this line.
If you are drawing both ideas simultaneously, make sure that the bottom of the eyes is the same size. Common mistake budding artists often make when drawing the same face from different inconsistent views or facial features with a different size.
Also, note that you can create a simple eye shape at this stage of the drawing process and leave details later (included in Step 7).
Step 4 – Drawing the Nose
As mentioned earlier, you will want to place the nose between the point across the horizontal end of the face and under the chin.
You can draw the nose as just a dot in a side view anime in the front. The nose is usually tiny and sharp.
Step 5 – Oral Drawing
To the mouth is a bit trickier to put as you will first want to get the position of the lip down to do it. Also, keep in mind that when it comes to anime and manga, the lower lip is usually not drawn to the preview of the characters.
The lower lip will be placed between the nose and the bottom of the chin. Draw the mouth itself a little above that.
You can probably draw a lip like one or two lines (actually just one line with a break in the middle to look ahead). If you look for a happy/friendly-looking character, you can draw him in a slight curve.
In the picture above, you can see how the first straight line from the tip of the nose down to the chin can be used to help you draw lips.
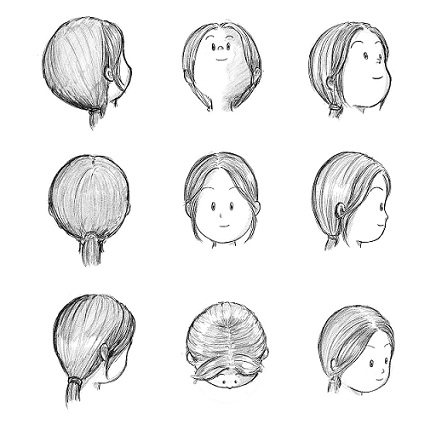
Step 6 – Hair Design
Add hair.
Keep in mind that the hair will transcend other characters’ facial features. But it is still a good practice to paint those, especially as they may be noticeable if you choose to paint a different hairstyle. You can wipe the parts covered with hair when you are done.
You can simply remove large sections of hair extensions in this section without small internal hair details. Adjust the clumps slightly with the shape and direction to give the hair a more natural look.
Step 7 – Drawing Small Face Details & Completing Line Drawing
In this section, you can clear the face parts covered with hair and add small details o the eyes like eyelashes, pupils, and highlights. You can also shade the eyelashes and add some points to the hair.
When painting the eyes, you can highlight the highlights (light reflections) with straight lines so that when searching for the eyes, you do not hide them again by mistake.
When you are done, you should have a complete line drawing of the head and face of an anime girl.
This is technically a finished painting, and you can leave it as it is, but if you want to go slow, you can move on to the next shading step.
You can see the drawing of the finished line of facial features without hair in the way in the picture above.
Step 8 – Applying Shading
You can add a basic blur to your drawing to make it stand out more.
Anime uses the “Cel” blurring style (fundamental blurring without gradients), making blurring faster and easier.
The way shading is used will be determined by two factors: naturally dark areas and shady places thrown into them.
Dark Places
You will usually want to make the hair darker and the eyes’ irises (leave the highlights white). Hide the pupils and the upper part of the iris even darker.
In the Shadows
The light source determines the way the shadows are distributed. As a result of this study, we will be dealing with “normal” light conditions where shadows are often thrown down.
In This Case, The Shadows (Top To Bottom) Will Be:
- Forehead – from the hair
- Eyelids – because they are decorated on the head (less light reaches)
- Over the Eyes – from the eyelids (somehow you can choose the ones that are the smallest to see)
- Nose – on one side
- Below the Mouth (optional) – from the lips.
- Neck – from the head
Conclusion
This tutorial provides general guidelines for drawing a woman’s face in anime or manga style.