Contents
How to Draw an Anime Elf Girl Step by Step
Draw an Anime Elf Girl – This tutorial shows you how to draw a female anime character or manga style with different ears, faces, and colors.
The ears are the main thing that makes anime/manga elves different from human characters. Sharp ears can be drawn on other types of mythical or sci-fi characters.
This course provides the following:
- Step-by-step classification of anime elf face painting
- Four different ways to draw elf ears
- Two variations of face painting
- A combination of two different colors (for normal or black elf characters)
If you will paint using pencil and paper, make sure you start with bright lines that you can easily erase. You will need to do so among some of the steps. You can trace over your line with a dark beat after placing various parts of the head/face. (Draw an Anime Elf Girl)
Step 1: Draw Institutional Guide & Head Overhead
Start by making a straight line in the center of your drawing area. This line can help you see that both halves of the head are equal in width.
Next, draw a circle representing the upper part of the head.
Step 2: Draw Bottom
To descend from the circle, draw the lower part of the head. The example above shows that the lower part should start with a pair of lines and then turn into another pair that joins a small curve to form a chin.
Step 3: Draw Neck and Shoulders
From the lower part of the face, draw lines of the neck that run down the shoulders. A slight addition of shoulders will make the painting look like a real image instead of a “floating” head. (Draw an Anime Elf Girl)
Step 4: Position & Draw Eyes
Eye contact first divides the face in half with a straight horizontal line. This line can also help you ensure that both eyes are at the same level.
In this case, the eyes will be much smaller, so draw them slightly below the line – In the first example, Draw eyes with their inner ends slightly downwards (nose).
In the meantime, leave small details like eyelashes, pupils, and reflections. These will be added to the latest step.
Horizontal Eye Space
Keep your eyes wide enough to keep one eye out.
Different Eye Types
Depending on the type of character you want to have, you can draw some eye variations. This one can be of a “gentle” personality. (Draw an Anime Elf Girl)
Draw them with their outer ends (sides of the face) facing downwards in this set of eyes.
Step 5: Place and draw eyebrows
The distance over the eyes draws the eyebrows in this collection of eyes drawdown eyebrows (nose-like).
If you have chosen a second eye style in the previous step, you can draw slightly raised eyebrows and a different pattern.
Step 6: Stop and Draw Nose
Draw a nose like a dot or a small vertical dot. On this particular face, position the nose above the center point between the line used for eye contact and the bottom of the chin. (Draw an Anime Elf Girl)
Step 7: Stop and Draw the Mouth
The lower lip of the mouth (not painted) will be about halfway between the lower nose and the lower chin. You can draw a real mouth just a little bit beyond that point.
In this case, the character will have a small smile so that you can pull your mouth alone and bend more than you normally would.
Step 8: Place and Draw the Ears of the Elf
How elf ears are painted can sometimes be a style decision but can also help emphasize a character’s personality. For example, high-pitched ears can mean a “sweet” personality. Ears that look down, on the other hand, can be attributed to mild-tempered or shy characters.
One explanation for this may be that animals tend to raise their ears when they are alert and lower when frightened. This is something everyone knows and is used to doing.
So drawing straight anime/manga straight ears in some ways can help send a clear message about the character that you are supposed to be. (Draw an Anime Elf Girl)
You can use the first two pairs for a normal/sweet face pattern, and the last one is gentle/shy.
Drawing Lifted Ears
Although the base of the ears is often hidden behind the hair, it is a good idea to know how to put it on the head when you want to express yourself and help avoid mistakes fully.
You can draw them with their tips raised very high (above the eyebrows).
You can usually place the base of the ears and the floor at the same level as the bottom of the nose or slightly below it. The surface may be around the top of the eyes.
Since both are style and fictional characters, the ear placement is not so important, but if you are far from where your drawing may end up looking weird.
Drawing High Middle Ears
You can draw ears with slightly lower ends as an alternative to the previous example.
Lay the base of these ears in the same way as in the previous example. You can do this in the next two sets as well. (Draw an Anime Elf Girl)
Drawing Lower Middle Ears
You can draw the ears downwards and associate them with the second set of eyes from the fourth step of a “gentle personality” look.
Drawing Down Lips
Finally, you can draw the “back” ears to bend to one side and hang farther down.
Step 9 – Draw Hair
You can imagine it is divided into front, sides, and back sections when painting hair, as shown below.
Draw the Front of Hair
This hairstyle starts with the previous section, as shown above. There will be a small clump between the remaining hairs swept on each side. (Draw an Anime Elf Girl)
Draw the Parts of the Hair
“On the front hair”, add the sides. Normally long hair will often “hug” the head/face, so draw each side with a simple curve.
Draw the Back of the Hair
Finally, add the back / top section as shown above.
Step 10 – Add Small Face Details
To complete the line drawing, add every little detail.
These include the following:
- Eyebrow tips (between eyebrows and eyes)
- Eyebrows
- Internal details of the eyes
- Inside Details of the Ears
- Curly hair
- Neck muscles/collar bones
Eye Details Drawing
You can see the step-by-step classification of eye painting above.
If you want to stand on a line drawing, you should add a little shading to the eyes (as shown in the example). If you are going to move on to the color section, you can add a grey color. (Draw an Anime Elf Girl)
You can now trace over your drawing with a black tap when you have finished adding small details (if you were drawing with a pencil and making simple lines as suggested at the beginning of the lesson). Alternatively, you can also use a black pen or marker, be careful not to make a mistake.
More facial Details
Above, you can also see what another version of this character with a slightly different set of ears / facial features might look like.
Step 11 – Color
This particular character will use only two main colors—one for the skin and the other for the hair, eyebrows, and eyes.
Green is a common color for anime hair. It can also be a good choice for the elf as it is often associated with forests and nature.
Please note that if you are coloring the paper, you may want to leave the hair highlights in white (see the last tutorial) and color them. If you dye digitally, you can add more hair color. You can also add them with a white fix pen or white paint. (Draw an Anime Elf Girl)
Dark Elf Color Variation
Also, you can make the character a black elf by changing the colors like the example above.
Step 12 – Complete the Elf Character Drawing
To complete the elf drawing add basic shading. The character will have the most common shadows that often occur in normal lighting situations.
Add shadows as follows:
- On the head/face is thrown hair
- With eyelids (really small)
- Over the eyes (from the eyebrows)
- Internal parts of the ears
- Next to the nose
- Below the lower lip (the lip itself is not drawn)
- Neck from head/hair
You can Add Shade to the Same Areas of the Black elf
After finishing the shadows, you can add some highlights to the hair. In this case, they will be made as a series of lines/zigzags, but you can also do some simple types of highlighting. (Draw an Anime Elf Girl)
There is no need to highlight the black elf as the hair is very white and will not be visible.
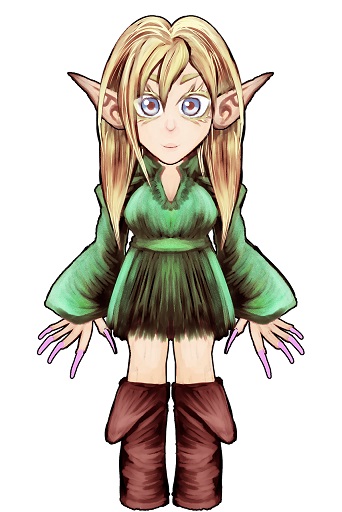
Normal Elf Character
You can see the great finished drawing of the first version of the elf girl above.
Another Elf Character
Another version of the “gentle personality” look.
Elf Elf Character
The black elf version is very similar but has a different color template.
Shameless Elf, Shame on you
And finally, with the last example, a black elf version of “gentle personality“.
Conclusion
Drawing an anime/manga-style character is very similar to drawing a person. However, you can use the ears to give yourself an extra personality, as shown by the four different types of ears with an elf.
Special Keywords – Draw An Anime Elf Girl, Draw An Anime Elf, Anime Elf Girl, Draw An Anime, Anime Elf