Contents
How to Draw an Anime Female Face 3/4 View
Draw An Anime Female Face 3-4 View – This tutorial explains how to draw a woman’s face anime or manga style in 3/4 view with examples with step-by-step pictures.
This tutorial uses a slightly more realistic style with a better-defined nose and lips. Although this is common in anime, it will allow you to see the placement of facial features better.
If you follow a drawing on paper, make sure you make the simplest lines in the first steps of the drawing, as you will need to do some deleting later.
Step 1 – Draw the Top of the Head
Start by drawing a circle on the upper part of the head. Now think of a circle as a circle and draw a line to determine which one is in the middle of the head. This line will bend like a sphere if you tie a string to the ball and look at it at the same angle you want to draw the face. If you were to look directly at the finish line, it would be a straight line, but the rope can turn when you turn the ball.
It would be helpful to start drawing a line all the way around (to make an oval) as the sphere is clear and clear the hidden part afterward. This way, you will not have a small chance of making a mistake in drawing the curve.
Step 2 – Draw the Facial Line Line
From the centerline of the project, a straight line is slightly angled inward (straight in the middle of the sphere). This line will be in the middle of the lower part of the face.
Step 3 – Draw Under Face
Draw the sides of the lower part of the face by adding lines from the circle to the bottom of the centerline.
Step 4 – Draw Face Features
In the example above, the facial features are as follows:
- Eyes – below the middle point of the horizontal head
- Nose – between the upper part of the eyes and under the chin
- Mouth – between the chin and lower nose with the lower lip with the upper lip slightly higher
- Ears – between the upper and lower eyes of the nose
It is important to note that the measurements given above are based on the centerline of all facial features (ears are not included). This is because the parts of the face near the viewer should be drawn larger than the distant parts. This is because of the idea.
Idea Drawing Tutorial for Beginners and How It Relates to Anime
Also, remember that the “far” eye, the eyebrow, and the side of the lips should be drawn shorter than the closest length. This is because they are smaller because of the vision and because of the curve of the head. The distant eye, eyebrow, and side of the lips will bend away from the viewer and should be pulled directly “pressed.” When the face turns sharply on the viewer, you should draw face features “far away.”
Draw the ear as long as a quarter of the face is placed between the eyes and below the nose.
Step 5 – Hair Design
You can usually imagine the hair is divided into front, sides, and top/back.
There is not much on the “front” side of the hair in this particular style, as it is tied on each side and covered with side hairs.
To create this hairstyle, you can trace the upper part of the hair in a way that is above the head but a short distance from the distance. As it turns downwards, it hangs down until it ends. Draw the ends of the hairs apart into bumps facing backward and bends to form the head.
On the side, hair makes them bend slightly inwards towards the face.
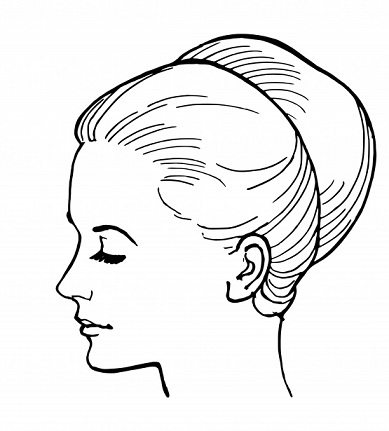
Step 6 – Cleaned Line Drawing
At this point, you can remove any building lines from your painting and erase any hidden parts of the hair. You should have a clean line drawing after you are done.
Step 7 – Color
In this step, fill in each area with the correct color if you color the paper and leave bright areas of hair visible on white eyes. Suppose digital coloring is added at the end.
Step 8 – Install Shading
As with many other studies here on AnimeOutline in this particular drawing, we will hide areas often shaded in the same light conditions as light from above.
Add shadow / darken the following areas:
- Some small shadows from the hair
- Small shadows around the eyelids as the area is bound. Usually, a little light will get there.
- Shadows on the upper part of the eyes from the eyelids
- Shadows and dark appearances of eyelids on top of irises
- Students (just black)
- Shadow down the nose
The lower ends of the hair as they begin to bend over towards the face and away from the light
Large shadow on the neck (fully drained neck)
Conclusion
As mentioned, this example shows some realistic facial features, but the same steps can be used to draw a traditional anime character.