Contents
How to Draw Anime and Manga Male Head and Face
Draw Anime and Manga Male Head – This step-by-step tutorial shows you how to draw an anime or manga head and face man from front to side.
Step by Step Drawing of Anime Male Faces
In this lesson, we will be drawing what the face of a young adult or anime character in high school will look like.
Manga and anime characters of this age tend to have more giant beards and longer faces with smaller / smaller eyes than their female or male counterparts. However, this may also vary depending on the style.
If you follow a pencil and paper tutorial, make sure you draw bright lines until you are done with your facial features and hairstyling steps. You will need to clear parts of the drawing later.
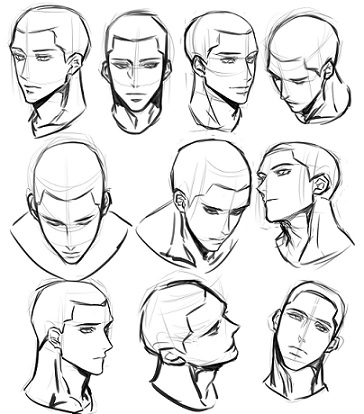
Step 1 – Drawing a Head
Preview
Draw a straight line in the middle of the head to help you see if the two sides are aligned.
Make the upper part of the head closer to the circle, and from there, draw two lines facing the center of the face followed by a set of curves and two lines with angles facing forward inwards. Join two groups of chin lines. Draw the chin with a slight curve but do not make it too straight, or the character will look masculine.
Side View
Draw the top of the head next to the oval shape.
You can see the fourth step in this nose training course. But do your best to balance its placement at this point. Make a small bump around the eyebrows followed by an indentation that shifts to the nose area.
And at this point, you can draw a straight line from the tip of the nose to the bottom of the chin.
Add the bottom of the jaw by drawing a line from slightly above the oval and folding it into another line that shifts to the chin.
Step 2 – Drawing Ears
To set the ears, draw a straight line between the head and another line between that and the chin. Draw the ears up and down between the two lines.
An in-depth drawing of the male anime’s inner ear
You can see the inner details of the ears above, but you may want to save the drawing after placing all the face features.
Step 3 – Eye Design
The larger and broader the paint, the younger your character’s eyes will look. In this case, the character is a young adult (or near), so the eyes will be smaller than the boys.
Draw the eyes with the upper part touching the center point on the face (use the line from the previous step) and leave enough space between them to fit the other eye.
Please note that the eyes will only be placed in this way when in their natural state. If they are very open, they can pass through this line, and when closed, they will go below the line. In the meantime, you can simply draw your basic outline. Details will be added in the latest step.
Draw eyebrows slightly above the eyes. Anime eyebrows and manga are often painted bigger than women, especially with older characters. But it also depends on the style.
Step 4 – Drawing the Nose
Demonstrate the nose by drawing a small straight bridge line and giving a single spark sparkle (slightly above the placement line). Place the nose details so that the bottom is half/line between the eye area and below the chin. Please note that the actual lower nose will not be pulled.
When you draw a side view of the nose, you will want to remove the bottom of the nose and mouth simultaneously as they are alternating.
Step 5 – Oral Drawing
Finally, place the mouth by drawing a line between the lower nose and the lower chin. This line will give you the position of the lower lip. Draw a lip just a little higher than this.
Draw the mouth with a simple curve and a small break in the middle. You can provide the lower lip with one short line. And please note that usually, older or younger male characters of the anime and manga tend to have wider mouths than females.
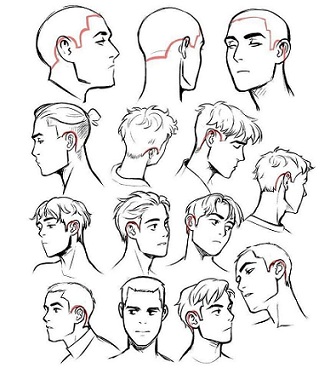
Step 6 – Hair Design
Draw hair on the top of the head. You want to paint in this way instead of just painting the coat quickly because seeing what the head looks like will help you set facial features (as done in previous steps). It will also help you style the hair itself as you see exactly how it sits on the head.
To get those “anime hair” looks, you draw hair into large square pieces.
To help you better understand how to draw hair, it can be beneficial to consider it as divided into three parts (front, side, and back/top).
- Red – Front Hair
- Green – Side Hair
- Blue – Back / Top Hair
You can draw the inner details of the ears (shown in step 2) before or after painting the hair.
Step 7 – Drawing Details & Completing Line Drawing
Wipe the hidden parts of the head and hair and add small eye details as students and highlights. You can then trim your drawing with black lines and add black accents or pencil shading (depending on what you are drawing) to the eye and eyebrow sections.
After completing this step, you should have a clean line drawing of the face. You can leave it at this stage or move on to the next step to add shading.
Step 8 – Add Specific Shading
Some basic anime-style shots (also known as “Cel Shading”) add to areas where shadows are most likely to occur in normal light conditions.
For a simple texture without gradients, you can add the following:
- Shots of tiny drops from the hair on the forehead and sides of the face
- Tiny shadows around the eyelids and the upper part of the white of the eyes
- Internal parts of the ears
- Under the nose
- The big shadow on the neck comes from the head.
It also darkens the hair and irises of the eyes but leaves the highlights in both areas white.
Conclusion
The heads and faces of male anime may vary depending on the style, but usually, when the character is older, they are very different from their female counterparts. Younger characters typically have very similar faces to women, while older surfaces are often painted with long faces, small eyes, and well-defined facial features.