Contents
I Want To Draw: A Simple Exercise For Perfect Beginners

Are you struggling with a simple circle from the first step of every lesson? Do your straight lines keep bending, no matter how hard you try? Do you seem to be able to draw two points at a given distance in the middle? Do your pictures look bad even after carefully repeating each step from a detailed lesson?
These problems may arise because of a lack of basic skills that can be taken into account when learning to draw. These skills are evident to someone who has been painting a lot but can also easily forget after a few years without a pencil in your hand. So are you ready to take on the best drawing skills for beginners?
For more pre-game promotions before taking on this challenge, check out the accompanying article, What Are Your Excuses? Why Can’t You Draw?
You probably want your work to look like pencil and paper if you are digital. May we recommend one of the many Photoshop brush sets available on GraphicRiver, including this Classic Art Brush Pack?
-
Break the Straight Line
Your problem: you can’t draw a straight line / complete circle.

Step 1
Drawing a straight line by hand is not valid. It is only available in vector as the shortest path between the two points. You can cheat and use a ruler, but your hand will probably not learn to draw a straight, long line even if it starts as complete; many mistakes are made if you draw it for a long time. What does it mean?
If drawing a long line is almost impossible, we can use short lines with our familiar hand. This way, it does not matter which tool you draw straight lines; they will usually come out very well. Just look at the picture below. When the lines are short, the image is closer to the original.
Step 2
Suppose you want to draw a flower like the one below. It is built with a straight line, a perfect circle, and a few curves with sharp angles. I think you can draw it very slowly, carefully, driving the lines from one point to the other, your tongue sticking out and sweating on your face. But why? Drawing is not a job; it should be fun!
Step 3
Technical drawing (straight lines, complete circles) needs focus. It is about drawing things as they are. There is no space for design or personal style, as style comes from variety. Is that really what you want to do? Draw the same objects all the time?
If you do, there is no lesson for you. Because drawing — creation — is about keeping your hand free while focusing on the result instead of creating a series of complete lines. Here’s what you need to learn — how to keep it simple, draw quickly and carelessly.
Let’s try to draw this flower again, right? But in this case, follow these simple rules:
- Divide long lines into short ones.
- When more curves are added, the lines become shorter.
- Touch the paper very slowly; do not press too hard on your pencil.
- Keep it fast!
Step 4
Wouldn’t that be fun? When you lower your eyes, it looks like it was done. Now, fill in the blanks between the lines with the missing one. The rules for the previous step are still valid.
Step 5
You can now highlight lines with a marker or by pressing a pencil. This step is not necessary; you can skip it.
Step 6
It happened! It doesn’t look exactly like the original, but you can see a particular style, part of your personality, the real work of your hands! You may notice that it looks more natural than it did at first because nature is not perfect. Most importantly, you can easily change everything once you cross the line!
Ironically, when your straight-line drawing is less accurate, the results become more natural.
Step 7
Now that you have learned to draw a straight line, what should you practice?
- Divide the lines into shorter ones.
- Draw circles made of short lines instead of long, continuously curved.
- Draw a little bit — in this way; your small mistakes will not appear.
Straightforward Drawing Exams For Beginners Tutorial Draw Fast
How To Create Your Art Style
Your problem: you feel like you can only draw things that other people have already created. Your drawings do not look like they are yours. If that is true of you, it’s time to learn to make your art style.

Step 1
To be able to draw circles with straight lines, right? That’s not good. You may be stuck with mathematics and graphic design rules — suitable for duplication but not creative. How can you help yourself? However, the first step in this study is good for you, but there is another tactic you can use.
As I said before, style comes in a variety of styles. If you carefully re-draw a picture, line by line, without adding anything new (because it could be a mistake!), You can’t end up with something different. The real one wasn’t yours, and your drawing is just a copy. I’m not saying you don’t follow the tutorial; you just have to be more discriminating with the help you render toward other people.
How can you lose a little bit of logical accuracy? Start with this simple task: draw a few simple situations with your hand moving, as if you are feeling nervous. Make it until you feel your hand free.
Step 2
Let’s try this simple lesson now. Do this in the same way as usual, but in Step 4, shake your hand as you draw the last lines. Draw a few of these heads, changing the level of motion constantly.
Step 3
Are you surprised? The whole head looks different from the original, but you can see who you just drew. Also, use the exact measurements for all of them, yet none of them looks the same. How was that possible?
While you were learning to write, your teacher wanted you to repeat the lines from the template. You spend a lot of time drawing (not writing) every character as if it were a minor masterpiece. Then, with time and knowledge, you build your writing character, your style. Your letters look different from mine or your friend’s, but still, we can all read what you wrote. Your style changed because you wanted to write faster — to write down your thoughts, not draw the perfect characters but make sense.
Apply this rule to your drawings. Think about what you want to achieve, not the lines. Draw quickly, and your personal, unique hand movements will have a chance to shine.
Step 4
There is something else that adds to your style: ingenuity. Do the same tutorial again, this time changing the effects of the action to your needs. You learn to draw a dragon’s head, but what if the dragons in your brain have long beaks? No problem! If you cannot get the right pitch, you do not want to be frustrated, so invest in a good capo. Just adjust the rules according to your needs.
Step 5
Okay, now you know how to make your art style. What’s next for you to get used to?
- Try to draw things in your place with moving, indifferent lines without worrying about the effect.
- Sketch more! Don’t think of the effect; let your hand shape its natural movements.
- If you follow this tutorial, stay smart — change the length, shape, distance, and see where it takes you.
How to Measure and Draw Ratings
Your problem: your ratings always look different. You feel like you can draw a given distance without using a ruler or other tools.

Step 1
Wrong ratings are a big problem for a budding artist. Fortunately, it can be overcome if you do not ignore it. First, what are the measurements?
Measurement is not a distance measured in a particular unit. They describe the location of a related object. If you want to paint the whole picture (set of elements) in duplicate, all the steps need to be duplicated.
Step 2
Let’s train our eyes to see and redraw the scales. First, try to repaint this image, but it is twice as small:
Step 3
Now, take the ruler and check if you got it right: the distance should be twice as short as the screen. Also, what is your outcome? Maybe not so good if you read this drawing measurement lesson. Note that circles must be twice as small, and that seems impossible: how to draw a double circle if you do not even know the actual size?
The answer is that we need at least two aspects to talk about relationships. No matter how significant the first element is, it cannot be unbalanced if there is only one! So let’s try again. Draw only the first circle.
Step 4
Now think of two lines from the centre of the circle. There is a third line of thought that connects both circles. Can you see what angle it is creating? Draw this line in your photo without adding a second circle for now.
If you have problems seeing the angle, try splitting the right angle into three and then every third one again. Each of them has 10 degrees.
Step 5
We need to set the distance now. How many circles can be placed between the two centres in the first one? Apply this relationship to your photo. It is good to have an actual print and draw some circles physically for the first time. Later, you can try pretending to draw them (you keep a pencil at the top of the paper/screen and see the circles in your mind).
Step 6
It’s almost over! Now we need to check the size of the second circle about the largest. An excellent way to do this is to think of a second circle within the first one so that you can see the proportions.
Step 7
Done! You can also use a ruler to see how accurate it is. This method is excellent if your eyes are not yet trained to see the scales, and in time you may no longer need to draw the features of the guide.
Step 8
You have done it! You have gone through all the steps to learn how to draw scales. To learn more, do the following:
Learn to see ratings everywhere. Look around and ask yourself: How tall are my fingers compared to the palm? How many heads can be placed in a row on my dog’s back? Which part of the face can fit best between the eyes? This training can be done during your leisure time, increasing your concentration. And, in time, your eyes will learn to do it without realizing it!
Do not avoid the practice if you have creative size problems (for example, you draw two identical circles, and they are always different). Draw these two circles as long as you can draw them, then try the same with triangles, squares, etc. This problem should be solved before taking another course, as it is the foundation of other skills.
The internet is full of simple, step-by-step lessons that do not teach fundamental drawing skills but are ready to practice equally well. Start with simple pictures of children and move on when you feel more confident. Also, do not go any further before developing these essential skills. No solid foundation can be built on a weak foundation.
Release Your Hand
Your problem: getting to draw parallel or similar lines is very difficult. The second line always goes the wrong way in some way.
Step 1
This sometimes happens when you try hard. You want to be accurate and, as a result, draw slowly and carefully, giving your hand a lot of time for mistakes. Try to draw both lines quickly: does it change something? If so, I’m glad I can help! If not, a little training may be required.
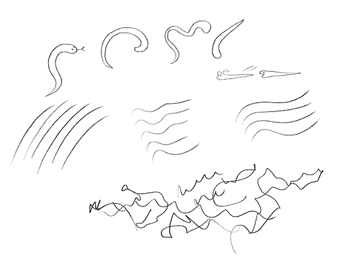
Drawing snakes is the most extensive and complex training I can think of. It allows you to practice the measurement, editing length, resize and angles, and, most importantly, teaches your hand how to move gracefully. If you read this section, you may have problems with snakes — they are thick at the same time, then thin and thick again, messy and unhealthy. But we can fix it!
Start with a row of circles, each smaller than its predecessor. Finish the line with one point.
Step 2
Connect the corresponding ends of the diameters. The simple snake made! Yes, there is still much to learn.
Step 3
Now draw a series of similar circles but also change their positions vertically.
Step 4
Connect them again.
Step 5
Let’s increase the level of difficulty. Do the same in the past, but now leave large spaces between circles.
Step 6
Connecting circles can be complex now, as you need to draw arches. This is an actual practice. Draw snakes, long and short, straight and curved, using large spaces in the centre of the circle whenever you see that you have got it right. If you do this long enough, your hand should learn to move correctly.
Step 7
What should you exercise?
- Snakes! Draw many of them; they are fast and easy;
- Draw a series of lines and parallel waves very quickly. Let your hand feel free!
- Draw zigzag lines while watching TV or reading articles online. No matter what you draw, just teach your hand how to move freely and carelessly.
Learn What Things Are … And Why They Are
Your problem: you can’t draw from the imagination. Everything goes well if you follow the tutorial, but you can’t remember the steps, or there is one stop that appears OK.
Step 1
Although the best drawing exercises for beginners will not help you here, you will be happy to hear that this is not as big a problem as it seems. You just have to change your attitude. The problem is that you are learning to draw lines instead of what the object is. There are two types of information:
Matrix (raster): Where is the point? Where is it connected? What is the distance between them? How many of them happened somewhere?
Vector: What’s the point? What is the point of this? What does this set of points do? How do other elements affect them?
Matrix information is a template for creating the same thing again. It is hard to remember and only helpful in a few cases. Vector information is measurable. When conditions change (different shapes, sizes, styles), the elements conform to them because they adhere to standards, not location. Here is an example:
Matrix Dog Head Information
- C1 – nose
- C3 – iso
- C1-E3 – mouth
- A3-E5 – head (etc.)
Vector Dog Head Information
- The head comprises two circles: the “brain case” and the mouth.
- The mouth is slightly higher than the middle of the side of the brain.
- The eye is circular and begins in the centre of the cerebral cortex, touching the mouth.
- The nose is on the tip of the mouth and is as big as the eye (etc.).
If you would like to change something, for example, open mouth, matrix information fails. Fixed, measurable only in size, and useless if you want to create a pose in 3D space. How can you learn from vectors, then?
Step 2
Take something and analyze it. There are two ways of thinking you can use it now (I will use glass as an example):
- The glass is made of a rectangle, and then there is a flat triangle under it, a very long line, and a flat triangle.
- The glass is made of an oblong container with a round section where the wine is poured. The upper part of the container can be bent inwards to prevent the blisters from slipping. The bottom of the bowl melts slowly into a thick layer. The leg then melts into a circular base.
What do you think? Which method best describes the essence of glass? The first one is faster and more significant when you start your drawing journey, but it will only allow you to draw this scenario. You may try to go into the 3D world, learn to look, add movement, and suddenly it turns out that you don’t know how to draw glass.
Step 3
Another example is anatomy. You can read body curves in one place, but it does not tell you anything about what the same body looks like when you run/sit/fight. The simple “why” has never been so powerful. Why does this part explode? What is it used for? Why is it long/short? Why is this part connected to another one?
Step 4
What Should You Exercise?
- Stop imagining the lines you see. Try to understand the whole thing. If you understand why it was designed and designed in this way, you will be able to fix it and create something that belongs to you without breaking the rules.
- Analyze things or do not draw. In the queue, on the bus, you wait for someone to turn around and ask yourself: why does it look like this? What is your purpose? With every “why” answer, you extend a great base of vector information to your head. You will be amazed at how helpful it is!
Now You Are Ready to Draw!
If you follow the tutorial carefully, you should be able to follow the middle tutorial ideally after some practice. Although these beginner drawing exercises may seem tedious, they are essential and need to be studied. If you have tried them and they seem insignificant, well done, you are ready! But if you have some problems, it is best to stop and practice until you overcome them.