Contents
How to Draw Hair | Step By Step
If the idea of hair painting is overpowering – you are not alone. It is easy to see all the details and texture inside the hair, and I think it should be hard to photograph it all with a drawing. But it doesn’t have to be complicated, and we can make the process easier, making hair coloring manageable.
In this tutorial, we will look at how to dye hair, and I will share with you a simple step-by-step look at and use media that can be used on any type of hair.
How to Draw Hair
We will first look at an easy-to-follow method divided into 4 different processes …
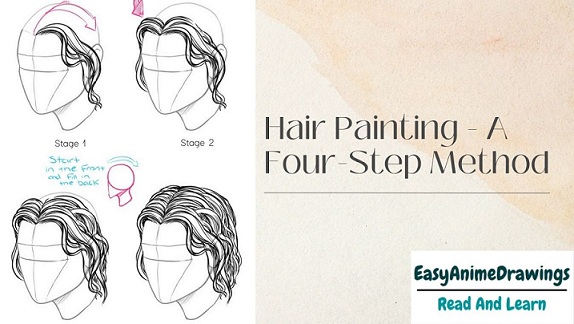
Hair Painting – A Four-Step Method
I may describe this process as a four-step process, yet it is similar to a three-step process. The third and fourth steps are combined and performed simultaneously. Before starting the hair coloring process, we need to make sure that the head structure is drawn in place. The structure of the head defines the shape and flow of the hair and should be explained before we start painting the hair.
Step One – Define the External Hair Contour
Assuming the head structure is in place, the first step is to define the outer contour or hair structure. This includes lines formed as hair passes through the forehead, parts of the face, and shoulders. In most cases, the hair rises from the skull and may pass through a large part of the face. Of course, every haircut is different, and the contours drawn in this section will be different for all subjects.
Draw a Hair Frame
Tip: The area you use will affect how you approach the haircut. In this study, graphite pencils are used. For example, if you are painting hair with pastels, you can choose to complement the shape of the hair with a solid color and skip drawing contours.
We will draw the line lines easily and freely with a solid and straightforward pencil, 2H. We are careful not to put too much pressure on the hard pencil as this can lead to paper cracks.
Step Two – Draw Hair Clumps
As we draw the computer lines, which describe the complete shape of the hair, we will also draw small shapes of hair collections. The hair strands naturally collect and form (which I refer to as “clump”).
Draw Hair Strands
It makes no sense to paint all the hair strands. This will take a lot of time to achieve and lead to the appearance of unnatural hair. Instead, we need to consider hair as a form. We will explain the volume of these forms in the next step, but we will focus on defining the shape for now.
Step Three – Improving Volume With Value
We understand forms because of the way light interacts and behaves in them. We understand light through value. Therefore, we understand the forms in the diagram by using a value. The amount of darkness or light color. The placement of the black and light values in the title informs us of the intensity of the light and the nature of the form.
We have to consider the numbers and tones seen inside the hair and incorporate them into our drawing to speak to the volume of the hair. In most cases, the entire value range is present. This means we can probably get a lot of darkness, very light lights, and average prices all within the head of the hair.
Drawing the Hair Form
Due to the nature of light, we can take a few things …
- Sloping areas will be darker in value.
- Emerging areas will be more straightforward in value.
- Regardless of the “color” of the hair, there will still be light and dark standards.
- We know that areas within the hairline near the source of light or stretch on the scalp may “catch” more light. Naturally, this results in a place of simple value.
We also know that sloping or blocked areas from getting light should be relatively dark.
All hair colors will include a full range of values. Blonds have darker tones on their hair, and people with darker hair have almost white (prominent) areas.
If we keep these things in mind, then we can assume that (in most cases) the parts of the hair and the areas around the face will be darker in value since these areas are backed up. We also know that the most prominent is most likely found at the top of the head, near the light source above.
To fully control the value, we will start with a solid 2H pencil and develop areas with a darker value, medium tones, and areas of light value. We will do our best to preserve the most prominent places, letting the white paper do us.
After using an intense, light pencil, we will move on to the darker and softer – talking to areas with the darkest value and tone. As we improve the width of the value and create the illusion of form, we will also consider the texture.
Intelligent Drawing
“Portrait Drawing The Smart Way” is a complete video tutorial for drawing pictures designed for beginners and intermediate artists.
Step Four – Draw Hair Style
(Hair texture is defined as the value is enhanced. Therefore, this process’s third and fourth steps are directed simultaneously.)
Composition, as a form, is also broadly defined by the use of value. The light and black values work together to inform us about the texture of the theme. High variability between prices with little change or order often leads to deceptive fabrication.
Smooth shifts between equally balanced values often lead to the illusion of a smooth surface texture.
But there is more to texture than just the connection between tone and importance. The top of the page, the way it is used, and how it is used are all factors that affect how the viewer can perceive the texture of the article.
The hair is soft, but there should be signs of line texture. To create the concept of the line texture, we will use the medium using straight lashes flowing over each “collection” form of hair. These lines are sometimes called cross lines.
Drawing Hair Texture
For each layer of graphite, we insert, we will use a stump that joins to work between the tooth or the texture of the paper. This will help create a smoother and smoother look for any inconsistencies produced by soft graphite applications.
Any areas inside the hair that need light can be supplied using a rubber. A rubber pencil or pen is very effective in lifting graphite in these areas. Simple hair strands can be developed using rubber as well.
We will add a few strands of hair from the hairline to finish. This stray hair can be intentionally marked with quick marks with a sharp HB pencil.
Drawing Hair With a Pencil
Hair is complex and therefore complex to draw. But by breaking down the steps, we can make the process a little easier. It is like drawing anything else if you know how to identify hair in terms of shapes, lines, and values.
Drawing a Hair Line
As with any subject you are drawing, practice is essential. The more we become acquainted with a subject, the better we comprehend it. Painting the entire head of hair will give you more practice. For some, though, the thought of doing so might scare them. Instead, it may be better to deal with part of the hair first. In this case, one strand of hair will do.
You could start by taking a picture of someone else’s hair – perhaps yours. Try to separate one part of the hair. Look for defined hair extensions that make up the shape.
Hair Lock
The four steps we tested above can be used for a single hair lock …
- Start by describing the shape in light, horizontal lines.
- Divide the hair lock into simple shapes.
- Look for outstanding bright, dark, and medium values.
- Improve texture and quantity with directional strokes.
- Hairline drawing
Hair Straight
In both of our first two examples, we saw how to paint curly hair. But not everyone has curly hair. So how is this process different when the hair is straight?
Well, it is not so different. We will use the same method to paint the hair of any style. The only exception with straight hair is that we may see minimal price changes. We will still see the difference between dark and light, but this will happen from the placement of the inside of each hair “collection.”
So again, we will first define the outer contour of the hair structure. And again, this would mean that you have to spend on these processes.
From here, we can look at the price relationships. It may help to take a closer look at your subject. Doing this can make the shape of a dark and straightforward value more vivid.
Steps for Drawing Hair
Then we will use straightening stroking to improve the texture and width of the value.
In the example below, a mixture of graphite and white coal is used to enhance the painting. The drawing is completed on the same paper, which makes the applications of white coal stand out. The image below is from Portrait Drawing The Smart Way.