Contents
How to Draw a Candy Apple Step by Step
Draw a Candy Apple – This tutorial shows you how to draw an apple in eight steps with line drawing, color examples, shading, and quick drawing tips.
Although candy apples are not limited to anime and manga are very common for those who celebrate. This example is drawn in a cel-shaded style (no gradients), also part of the anime.
When drawing on paper, it is recommended that you start with a pencil tutorial and make simple strokes, as you will need to erase the construction lines used in some of the steps.
Step 1 – Make a Simple Design Candy Apple
Start by drawing a horizontal line that will help ensure that both apple halves are closer together. You can extend the line farther down the bottom of the drawing area to match the visible length of the rod. (Draw a Candy Apple)
Next, draw the outer shape of the apple (like a circle). Place it near the upper part of the straight line to have enough space for the rod.
Step 2 – Define Top
When an apple is soaked in its crumbs and used to dry caramel (or whatever it is used for), it will usually form a flat surface beneath it.
If the apple is turned upside down, this flat part will be as high as this example.
You can add another part to the building drawing to help visualize this area.
First, draw a horizontal line, set a centre line and draw an oval around it (circular viewing at an angle). To illustrate the point, draw the lower part of the oval slightly longer than the upper. While this particular study is very difficult to see, the details are still something to be aware of.
Step 3 – Draw an apple
Now draw a real apple frame based on a construction drawing made in the last two steps. You can delete any additional lines after that but for now, leave the centre horizontal and oval (shown in blue).
Step 4 – Draw Stick
Lowering the apple, add to the stick on which the sweet apples usually sit. You can also use the straight line drawn in the previous step as a guide. (Draw a Candy Apple)
In this case, he says it will be drawn slightly, but you can see an example of its full length at the end of the lesson.
Step 5 – Draw the Top of the Wrapper
Sweet apples usually have a clear plastic wrap around them. The shape of these folds may vary, but you can draw something similar to the example above.
Be sure to make the folds uneven to show bending and rolling. And make it smaller near the bottom as it is where it will be tied.
Step 6 – Draw the Bottom of the Wrapper & Folds
At the bottom of the wrapper, add a little bit where it is tired to the stick and add a little sticky stick to the bottom. Draw this with several folds, as shown in the example. (Draw a Candy Apple)
After that, draw a few folders in the upper part of the wrapper.
You can trace over your lines with a black pencil stroke or a small black marker when you are done. However, keep the wrapper lighter frame (as shown in the example). This will make it look lighter and look like a real piece of plastic that shows through.
Step 7 – Add Color
You can colour the apple and a little tie in a red wrapper, the stick is light brown, and the cover is light grey. (Draw a Candy Apple)
When you colour the apple, you will want to leave some bright spots running on both sides and its edges to appear (it runs in the shape of an egg from the previous steps). Also, leave a large highlight area to the upper part of one of the sides.
And when you draw on paper, you can first place the highlights with a red pencil to make sure you do not colour over it by mistake. If you paint digitally, you can add highlights over colour.
You can leave a lot of pure white highlights but make a little shade of those on the opposite side of the main red highlight (highlight right of the drawing). The implication is that many of the highlights will be created by the main source of light while others will be created by light that reflects other objects, so it will not shine in the same way.
Many extra additions will help give the apple a smooth and glossy look.
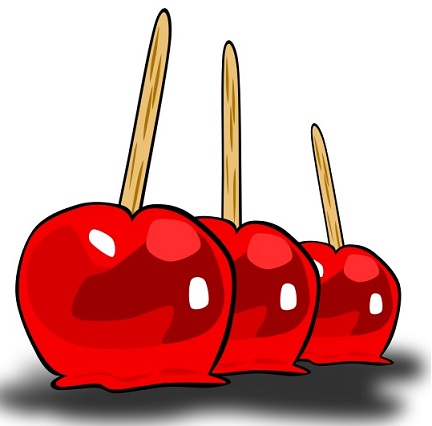
Step 8 – Apply Shading & Complete Apple Candy Drawing
To complete the drawing add the most basic shading to the apple. In this case, the light will be on the top left, so shadows will often form at the bottom right. (Draw a Candy Apple)
You can also add a small black spot in the middle of the flat area at the top. As the apples rotate inward, this will be reflected in the donkey’s display and create a dark spot on it.
Next, add a little shadow under the flat top of the apple to create a small ledge that will cast the shadow under it. This should turn into a large shadow on its sloping side. Then add a small piece of an even darker shade to the larger side shade; however, leave some space between that and the side of the apple. And make sure you do not overdo it when blurring.
Finish by darkening the upper part of the stick shaded with an apple. (Draw a Candy Apple)
Above, you can also see an example of an apple with the full length if you want that for reference.
Conclusion
Candy apples are very common in anime, and manga featuring festivals and festivals is common in anime, especially in the “Slice of Life” genre.
This tutorial shows you an easy way to draw one while at the same time following good drawing habits and maintaining the right style for anime and manga.