Contents
How To Draw Anime Eyes And Eye Expressions
Draw Anime Eyes Expressions – There are many ways to draw anime eyes. This tutorial shows you how to draw anime eyes with different words in one style from a preview.
An Example of How To Draw Anime Eyes
Step 1 – Draw Eye Condition
One defining feature of anime eyes is that they are usually much more significant and broader than natural eyes, so we will draw them like that.
The eyes should be far enough apart to insert the third eye.
To get a typical sentence, draw the iris slightly covered by the upper eyelid while just touching the lower eyelid. Draw eyebrows slightly above the eyes for a smooth curve.
When you draw different expressions, the shape of the eyebrows and the positions and positions of the students may vary.
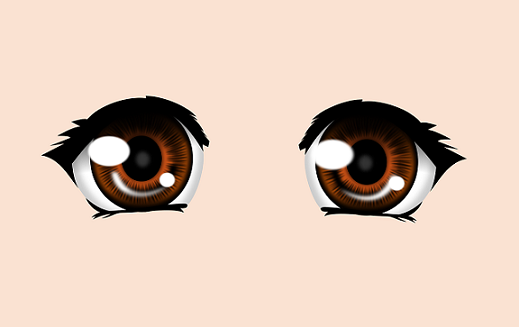
Step 2 – Draw Readers and Answers
Draw the reader in the middle of the iris.
The position of the display will depend on the location of the viewer.
There may be more than one display, depending on how many light sources are present. This time we have two. One is the primary light source, and the other is the secondary light source.
For example, if you draw a character standing outside on a sunny day, the leading light in the eyes can be caused by the sun, and the second may be from the sun from something else.
Step 3 – Add Shading
To create eye shadow, as in the example above, you can do very well with everything except the inner part of the iris and dark reflections.
Leave the shows white and make the iris area gray.
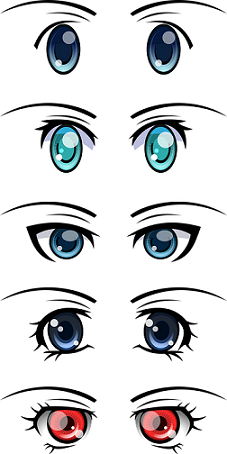
Drawing Different Anime Eye Expressions
The Factors That Determine The Appearance of the Eyes are:
- The shape and shape of the eyebrows
- Position of students
- The shape of the eyelids
One significant difference between drawing realistic eye expressions is that in anime and manga, the student’s size can be adjusted to create a more dramatic presentation (for example, an edgy look).
Below is a breakdown of each statement.
Drawing Normal Anime Eyes
Draw as described above in the first part of the lesson.
Drawing Angry Anime Eyes
For an angry look, draw eyebrows on the floor in an internal wave shape. Draw the upper eyelids down the inner slope and draw the learners slightly curled.
Drawing Lazy Anime Eyes
To make you look bored, draw students wrapped and eyelids slightly lowered.
Drawing Shame / Shame Anime
For a more casual or embarrassing look, draw down your eyes and draw the lower eyelids slightly.
Drawing Sad Anime Eyes
For a sad look, draw the closed eyes. Draw the lower eyelids in a small area facing down. Draw the outer edges of the eyebrows down with a smaller arch than usual or even an arch facing downwards.
Drawing Anime Awesome Eyes
To look fabulous, pull your eyes open and open all raised eyebrows. When you draw eyes wide and raise your eyebrows far away, the character will be even more amazed.
Drawing Awesome Anime Eyes
To look at the fear, pull eyes open and eyebrows raised. You can also draw students smaller than usual. When you draw young readers, your character will look scared.
Happy Drawing / Content Anime Eyes
Fun or content anime eyes closed in the form of eyes in an arch facing down. This is probably the simplest example of drawing anime eyes as there are almost no details to worry about.
Putting an Anime or Manga Eyes on the Head
Natural eyes are found in the middle of the head. Anime eyes often draw too far under the head.
An excellent guide to drawing anime eyes is to draw a horizontal line in the middle of the head, as shown in the example above, and remove the looks below.
It is important to note that if the eyes are closed or stripped, the upper eyelashes will need to be pulled continuously from the horizontal line in the pattern. If the eyes are open, the eyelashes will need to be pulled up.
Conclusion
There are probably countless anime eyes, but the guidelines and tips used in this tutorial can apply no matter what style you choose.